
| Established On | 1914 |
| Place | Hobart,Australia |
| Know As | Blundstone Arena |
| Capacity | 19,500 |
| Floodlights | Yes 2009 |
| End Names | Church Street End, River End |
| Hometeams | Tasmania, Tasmania, Hobart Hurricanes |
| Timezone | UTC +11:00 |
| Location | Hobart, Australia |
| Curator | Marcus Pamplin |
| Updated On 2025-02-20 07:38:05 By Puspendra Singh | |
| Our Telegram | Download Our App |
Delve into the records and statistics at Bellerive Oval, including milestones, achievements, and notable performances, to celebrate the rich cricketing legacy of this iconic venue Bellerive Oval.
| Competitions | ODI | T20 | BBL |
| Matches | 10 | 14 | 103 |
| Runs | 4898 | 4156 | 30846 |
| Highest Score | 363 | 213 | 212 |
| Lowest Score | 130 | 51 | 60 |
| Average | 489.8 | 296.9 | 299.5 |
| Balls Faced | 5347 | 3041 | 23388 |
| Strike Rate | 91.6 | 136.6 | 131.8 |
| 100-149 Runs | 2 | 13 | 85 |
| 150-199 Runs | 3 | 9 | 105 |
| 200-249 Runs | 6 | 4 | 7 |
| 250-299 Runs | 3 | 0 | 0 |
| 300-349 Runs | 5 | 0 | 0 |
| 350-399 Runs | 1 | 0 | 0 |
| 400+ Runs | 0 | 0 | 0 |
| 4s | 413 | 401 | 2798 |
| 6s | 75 | 129 | 803 |
| Outtype | |||
| Lbw | 11 | 7 | 84 |
| Bowled | 21 | 33 | 226 |
| Stumped | 2 | 3 | 34 |
| Catch | 101 | 123 | 822 |
| Run Out | 10 | 8 | 86 |
| Wicket Taker | |||
| Left Arm | 30 | 38 | 238 |
| 1- Fast | 10 | 9 | 8 |
| 2- Fast-Medium | 7 | 10 | 95 |
| 3- Medium | 4 | 5 | 12 |
| 4- Slow | 9 | 14 | 120 |
| 1- Bowled | 6 | 7 | 43 |
| 2- Catch | 18 | 30 | 169 |
| 3- Stumped | 2 | 1 | 11 |
| 4- Lbw | 4 | 0 | 15 |
| Right Arm | 105 | 128 | 921 |
| 1- Fast | 25 | 16 | 78 |
| 2- Fast-Medium | 64 | 55 | 340 |
| 3- Medium | 4 | 18 | 234 |
| 4- Slow | 12 | 37 | 254 |
| 1- Bowled | 15 | 26 | 179 |
| 2- Catch | 83 | 93 | 649 |
| 3- Stumped | 0 | 2 | 23 |
| 4- Lbw | 7 | 7 | 69 |
| Competitions | ODI | T20 | BBL |
| Matches | 10 | 14 | 103 |
| Won | 4 | 7 | 48 |
| Loss | 6 | 6 | 55 |
| No Result | 0 | 1 | 0 |
| Competitions | ODI | T20 | BBL |
| Matches | 10 | 14 | 103 |
| Balls | 5347 | 3041 | 23388 |
| Runs | 4898 | 4156 | 30846 |
| Average | 33.8 | 23.5 | 24.5 |
| Strike Rate | 36.9 | 17.2 | 18.6 |
| Maiden | 33 | 3 | 23 |
| 3-4 Wickets | 4 | 3 | 49 |
| 5-7 Wickets | 6 | 10 | 77 |
| 8-9 Wickets | 4 | 8 | 41 |
| 10 Wickets | 6 | 4 | 27 |
| Wickets | 145 | 177 | 1257 |
| Lbw | 11 | 7 | 84 |
| Bowled | 21 | 33 | 226 |
| Stumped | 2 | 3 | 34 |
| Catch | 101 | 123 | 822 |
| Hit wkts | 0 | 0 | 0 |
| Batsman Type | |||
| Right Handed | 97 | 123 | 897 |
| 1- LBW | 5 | 5 | 65 |
| 2- Bowled | 15 | 27 | 161 |
| 3- Stumped | 2 | 0 | 28 |
| 4- Catch | 70 | 85 | 576 |
| Left Handed | 48 | 51 | 354 |
| 1- LBW | 6 | 2 | 19 |
| 2- Bowled | 6 | 6 | 64 |
| 3- Stumped | 0 | 3 | 6 |
| 4- Catch | 31 | 38 | 246 |
| Score | Inn1Score | Inn2Score |
|---|---|---|
| 20/02/25 | TASW 259-8 (50.0) | VCTW 229-10 (48.1) |
| 17/02/25 | TASW 254-5 (50.0) | VCTW 253-9 (50.0) |
| 01/02/25 | ACTM 153-10 (42.1) | TASW 156-2 (29.4) |
| 30/01/25 | TASW 284-6 (50.0) | ACTM 181-10 (42.2) |
| 27/01/25 | THU 182-7 (20.0) | HUR 185-3 (14.1) |
| 21/01/25 | HUR 173-7 (20.0) | SIX 161-5 (20.0) |
| 15/01/25 | AU-W 308-8 (50.0) | EN-W 222-10 (42.2) |
| 14/01/25 | REN 154-7 (20.0) | HUR 155-6 (19.4) |
| 10/01/25 | THU 164-6 (20.0) | HUR 165-4 (16.5) |
| 05/01/25 | STR 186-5 (20.0) | HUR 187-5 (18.4) |
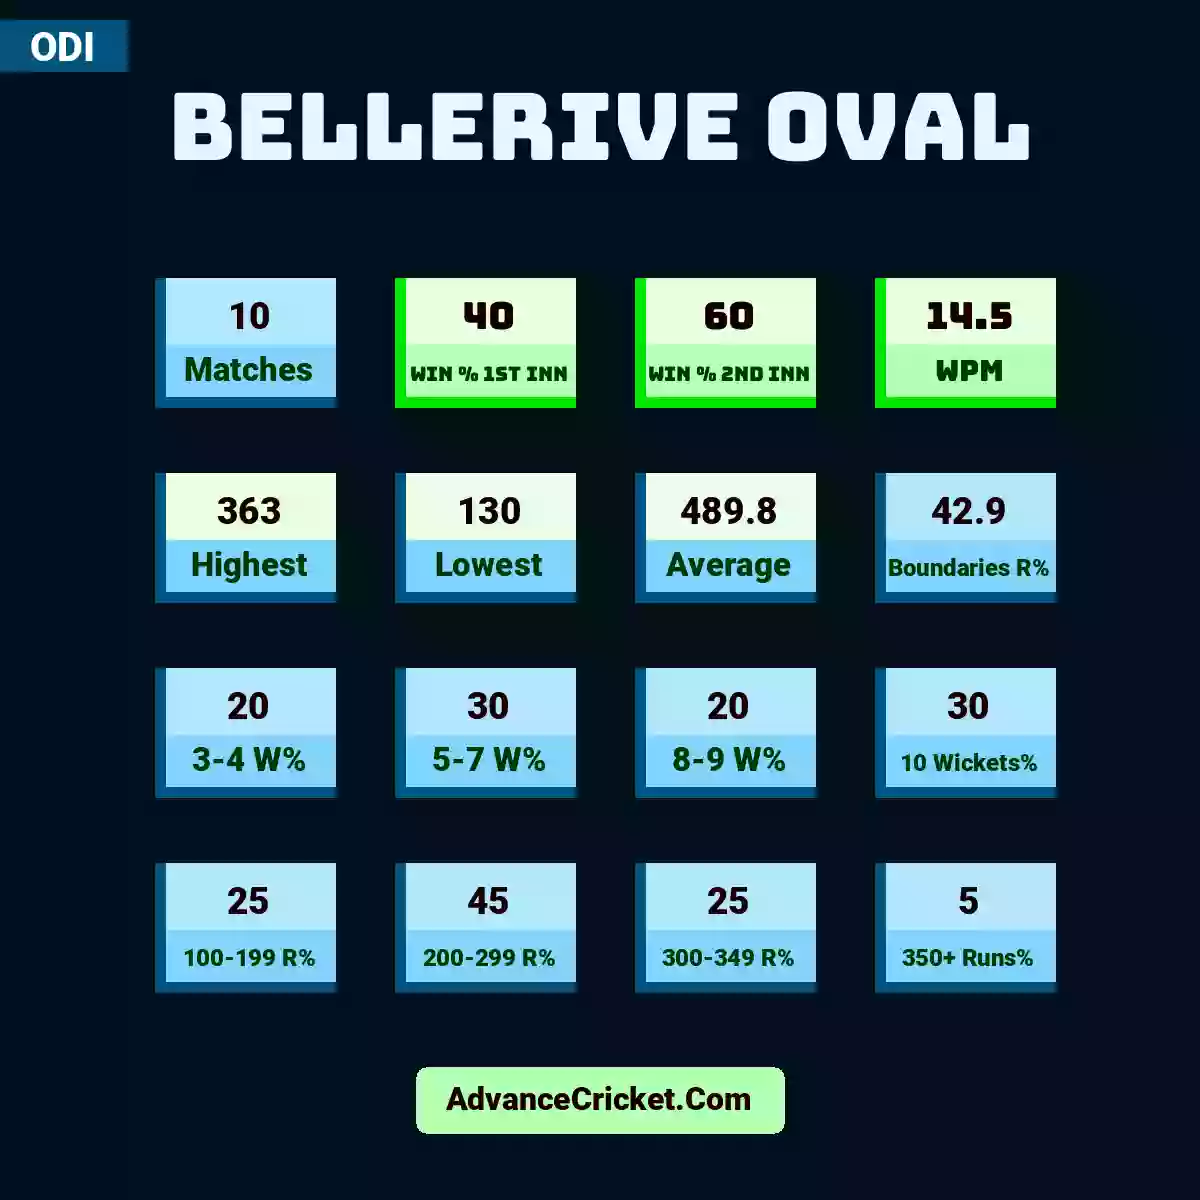
Bellerive Oval organised 10 ODI matches. First Batting Team won 4 matches and chashing team won 6 matches. 4898 runs scored by 5347 delivered balls in total 10 ODI matches (with both innings runs) and per match runs average is 489.80 & strike rate is 91.6 . Highest score for ODI is 363 & Lowest score is 130 on Bellerive Oval. Boundaries count are 488 with 75 sixes and 413 fours on Bellerive Oval. Score analysis are 100-149 Runs 2 times, 150-199 Runs 3 times, 200-249 Runs 6 times, 250-299 Runs 3 times, 300-349 Runs 5 times, 350-399 Runs 1 times times, 400+ Runs 0 times on Bellerive Oval. Batsman wicket analysis are lbw 11 times, bowled 21 times, stumped 2 times, catch 101 times, run out 10 times on Bellerive Oval. Wicket Taker are Left Arm 30 wickets and Right Arm 105 wickets on Bellerive Oval. Left Arm Wicket Taker's analysis are Fast bowler 10 wickets, Fast-Medium bowler 7 wickets, Medium bowler 4 wickets, Slow bowler 9 wickets on Bellerive Oval. Batsman wicket taken by Left Arm Bowlers in Bellerive Oval analysis are lbw 4 wickets, bowled 6 wickets, stumped 2 wickets, catch 18 wickets. Right Arm Wicket Taker's analysis are Fast bowler 25 wickets, Fast-Medium bowler 64 wickets, Medium bowler 4 wickets, Slow bowler 12 wickets on Bellerive Oval. Batsman wicket taken by Right Arm Bowlers in Bellerive Oval analysis are lbw 7 wickets, bowled 15 wickets, stumped 0 wickets, catch 83 wickets.
Bowlers Took 70 Wickets (In 10 ODI matches) with Strike Rate of 36.87 and Average of 33.77 on Bellerive Oval. 97 Right Handed AND 48 Left Handed batsman out by bowler on Bellerive Oval. Right Handed Batsman ODI outtype analysis are LBW 5 times, Bowled 15 times, Stumped 2 times, Catch 70 times on Bellerive Oval. Left Handed Batsman ODI outtype analysis are LBW 6 times, Bowled 6 times, Stumped 0 times, Catch 31 times on Bellerive Oval.
Fielding analysis are Catch 101 times, Stumping 2 times, Direct Throw(Run Out) 6 times, Throw(Run Out) 4 times on Bellerive Oval.
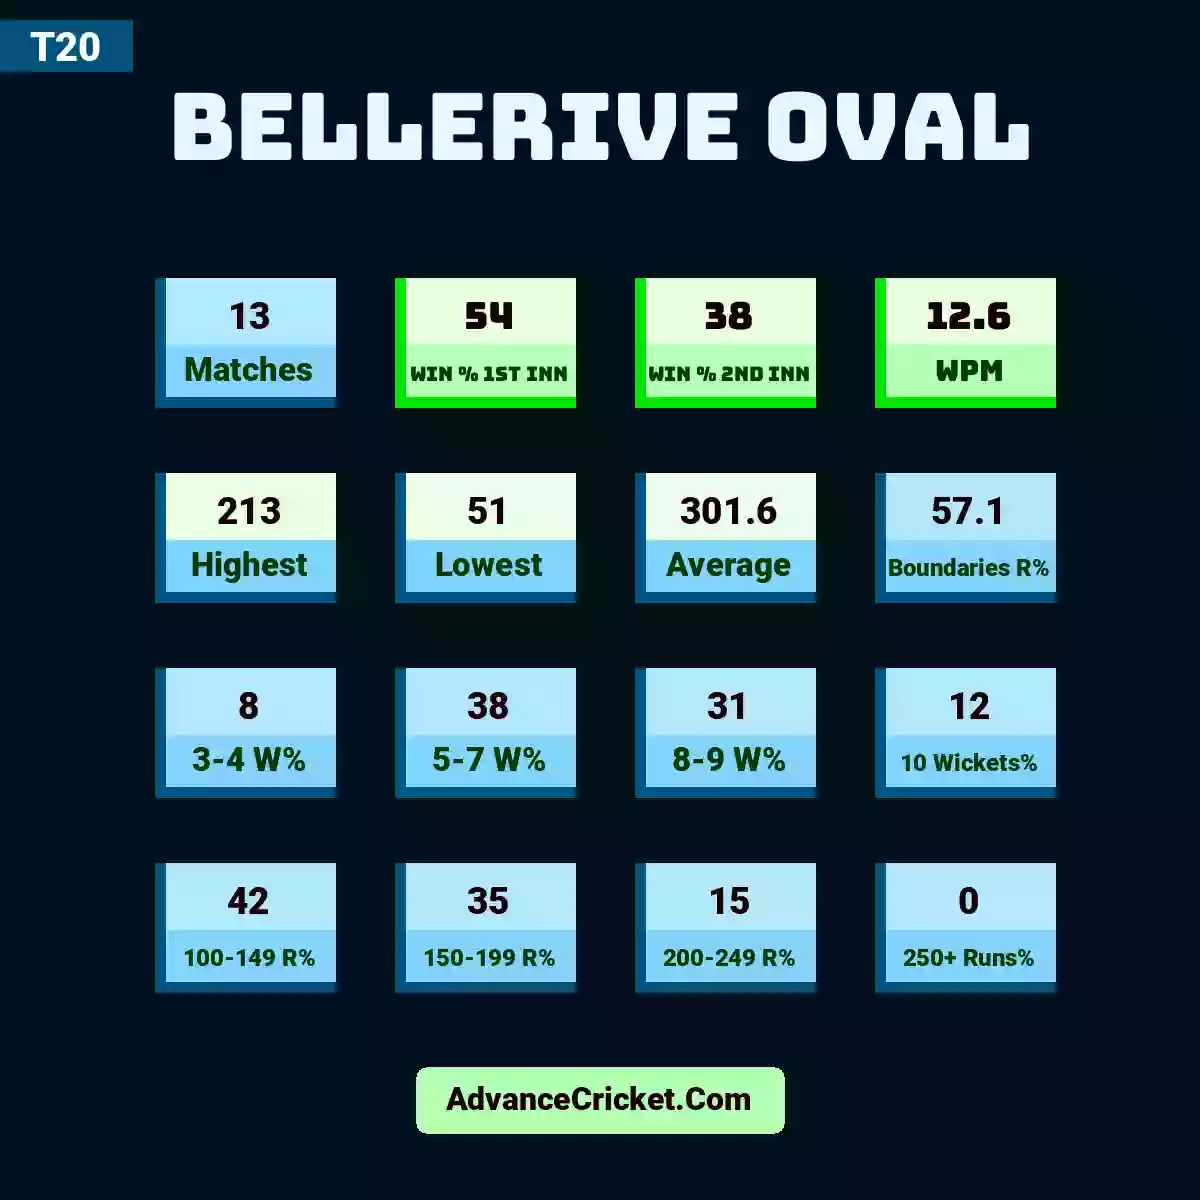
Bellerive Oval organised 14 T20 matches. First Batting Team won 7 matches and chashing team won 6 matches. 4156 runs scored by 3041 delivered balls in total 14 T20 matches (with both innings runs) and per match runs average is 296.85 & strike rate is 136.6 . Highest score for T20 is 213 & Lowest score is 51 on Bellerive Oval. Boundaries count are 530 with 129 sixes and 401 fours on Bellerive Oval. Score analysis are 100-149 Runs 13 times, 150-199 Runs 9 times, 200-249 Runs 4 times, 250-299 Runs 0 times, 300-349 Runs 0 times, 350-399 Runs 0 times times, 400+ Runs 0 times on Bellerive Oval. Batsman wicket analysis are lbw 7 times, bowled 33 times, stumped 3 times, catch 123 times, run out 8 times on Bellerive Oval. Wicket Taker are Left Arm 38 wickets and Right Arm 128 wickets on Bellerive Oval. Left Arm Wicket Taker's analysis are Fast bowler 9 wickets, Fast-Medium bowler 10 wickets, Medium bowler 5 wickets, Slow bowler 14 wickets on Bellerive Oval. Batsman wicket taken by Left Arm Bowlers in Bellerive Oval analysis are lbw 0 wickets, bowled 7 wickets, stumped 1 wickets, catch 30 wickets. Right Arm Wicket Taker's analysis are Fast bowler 16 wickets, Fast-Medium bowler 55 wickets, Medium bowler 18 wickets, Slow bowler 37 wickets on Bellerive Oval. Batsman wicket taken by Right Arm Bowlers in Bellerive Oval analysis are lbw 7 wickets, bowled 26 wickets, stumped 2 wickets, catch 93 wickets.
Bowlers Took 70 Wickets (In 14 T20 matches) with Strike Rate of 17.18 and Average of 23.48 on Bellerive Oval. 123 Right Handed AND 51 Left Handed batsman out by bowler on Bellerive Oval. Right Handed Batsman T20 outtype analysis are LBW 5 times, Bowled 27 times, Stumped 0 times, Catch 85 times on Bellerive Oval. Left Handed Batsman T20 outtype analysis are LBW 2 times, Bowled 6 times, Stumped 3 times, Catch 38 times on Bellerive Oval.
Fielding analysis are Catch 123 times, Stumping 3 times, Direct Throw(Run Out) 3 times, Throw(Run Out) 5 times on Bellerive Oval.
Bellerive Oval organised 103 BBL matches. First Batting Team won 48 matches and chashing team won 55 matches. 30846 runs scored by 23388 delivered balls in total 103 BBL matches (with both innings runs) and per match runs average is 299.47 & strike rate is 131.8 . Highest score for BBL is 212 & Lowest score is 60 on Bellerive Oval. Boundaries count are 3601 with 803 sixes and 2798 fours on Bellerive Oval. Score analysis are 100-149 Runs 85 times, 150-199 Runs 105 times, 200-249 Runs 7 times, 250-299 Runs 0 times, 300-349 Runs 0 times, 350-399 Runs 0 times times, 400+ Runs 0 times on Bellerive Oval. Batsman wicket analysis are lbw 84 times, bowled 226 times, stumped 34 times, catch 822 times, run out 86 times on Bellerive Oval. Wicket Taker are Left Arm 238 wickets and Right Arm 921 wickets on Bellerive Oval. Left Arm Wicket Taker's analysis are Fast bowler 8 wickets, Fast-Medium bowler 95 wickets, Medium bowler 12 wickets, Slow bowler 120 wickets on Bellerive Oval. Batsman wicket taken by Left Arm Bowlers in Bellerive Oval analysis are lbw 15 wickets, bowled 43 wickets, stumped 11 wickets, catch 169 wickets. Right Arm Wicket Taker's analysis are Fast bowler 78 wickets, Fast-Medium bowler 340 wickets, Medium bowler 234 wickets, Slow bowler 254 wickets on Bellerive Oval. Batsman wicket taken by Right Arm Bowlers in Bellerive Oval analysis are lbw 69 wickets, bowled 179 wickets, stumped 23 wickets, catch 649 wickets.
Bowlers Took 70 Wickets (In 103 BBL matches) with Strike Rate of 18.60 and Average of 24.53 on Bellerive Oval. 897 Right Handed AND 354 Left Handed batsman out by bowler on Bellerive Oval. Right Handed Batsman BBL outtype analysis are LBW 65 times, Bowled 161 times, Stumped 28 times, Catch 576 times on Bellerive Oval. Left Handed Batsman BBL outtype analysis are LBW 19 times, Bowled 64 times, Stumped 6 times, Catch 246 times on Bellerive Oval.
Fielding analysis are Catch 822 times, Stumping 34 times, Direct Throw(Run Out) 34 times, Throw(Run Out) 52 times on Bellerive Oval.
Bellerive Oval Hobart Established On 1914 at Hobart,Australia. Blundstone Arena is the famous name of Bellerive Oval. The capacity of the Bellerive Oval Hobart is around 19,500. Floodlights are embed in Bellerive Oval. Bellerive Oval Hobart have Church Street End, River End. Bellerive Oval located on UTC +11:00 Timezone. Marcus Pamplin is Curator of Bellerive Oval Hobart. Cricket Hometeams of Bellerive Oval are Tasmania, Hobart Hurricanes.